


Comprehensive step-by-step installation tutorials
🛠️ Step-by-Step Installation Guide: How to Install a High-Output Alternator
Upgrading to a high-output alternator is one of the smartest ways to boost your vehicle’s electrical system. Whether you’re powering a massive sound system, off-road accessories, or heavy-duty towing gear, proper installation ensures optimal performance and safety.
In this guide, we’ll walk you through a comprehensive, step-by-step process to install your new high-output alternator safely and efficiently.
📦 Tools & Materials You’ll Need
- New high-output alternator (from HighOutputAlternator.com 😉)
- Socket wrench set
- Torque wrench
- Belt tension gauge or breaker bar
- Voltmeter or multimeter
- Safety gloves and eye protection
- Replacement serpentine belt (optional but recommended)
- Anti-corrosion battery terminal spray (optional)
- Wiring upgrade kit (if doing Big 3 Upgrade)
✅ Step-by-Step Installation Instructions
🔌 Step 1: Disconnect the Battery
Why: To prevent short circuits or electrical injury.
- Disconnect the negative battery terminal first.
- Then disconnect the positive terminal if necessary.
🔧 Step 2: Remove the Drive Belt
Why: To access and remove the alternator.
- Use a breaker bar or serpentine belt tool to relieve tension.
- Slide the belt off the alternator pulley carefully.
- Inspect the belt; replace it if worn, cracked, or stretched.
🔩 Step 3: Disconnect the Old Alternator
Why: To safely remove your factory alternator.
- Unplug the electrical connector (voltage regulator)
- Remove the main power cable from the back (usually secured with a nut)
- Unscrew the mounting bolts and remove the alternator from the bracket
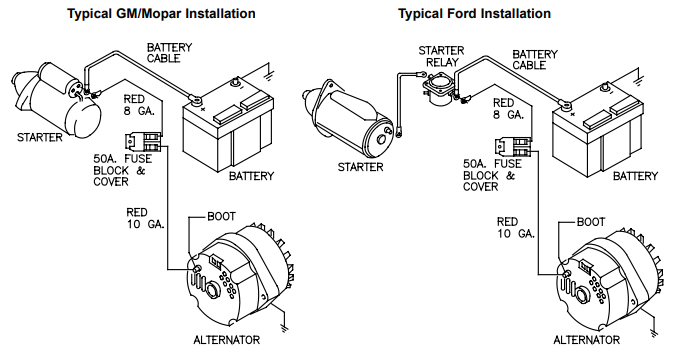
⚙️ Step 4: Install the New High-Output Alternator
Why: Proper fit and torque ensure long-term stability.
- Position the new alternator into the bracket
- Install the mounting bolts and hand-tighten
- Torque bolts to manufacturer specs using a torque wrench
- Reconnect the main power wire and electrical plug
Tip: Make sure there’s no tension on the wiring or contact with sharp metal edges.
⛓️ Step 5: Reinstall the Drive Belt
Why: Restores power to the alternator and other engine accessories.
- Route the belt back over the pulley according to the diagram (usually under the hood)
- Apply tension using a belt tensioner or breaker bar
- Check for proper tension—tight, but with about 1/2″ flex
🔋 Step 6: Reconnect the Battery
Why: To power the new alternator.
- Reconnect the positive terminal first
- Then reconnect the negative terminal
- Spray anti-corrosion compound on the terminals if desired
🔍 Step 7: Test the Charging System
Why: To confirm the alternator is working properly.
- Start the engine
- Use a multimeter to check voltage at the battery terminals
- You should see 13.8V to 14.8V with engine running
- Turn on headlights, A/C, and sound system to ensure voltage remains stable under load
💡 Pro Tip: Do the Big 3 Upgrade
If you’re installing a high-output alternator (200A+), consider upgrading the following wires:
- Alternator to battery (positive)
- Battery to chassis ground
- Engine block to chassis ground
Use 1/0 AWG or 4 AWG copper cable and fused connections for safety and performance.
🚫 Common Mistakes to Avoid
- 🔧 Overtightening mounting bolts
- 🔌 Forgetting to disconnect the battery before starting
- 🔋 Reusing old or undersized wiring
- ❌ Not checking output voltage after installation
- 🔥 Running a high-amp alternator on stock wiring (risk of overheating or fire)
🧪 After Installation Tips
- Check your voltage weekly for the first month
- Watch for signs of belt slipping (squeal noise, burning smell)
- Retorque bolts after ~100 miles of driving
- Keep alternator vents clear of dirt and oil
🔧 Final Thoughts
Installing a high-output alternator is a straightforward process if done right. Whether you’re upgrading for performance, audio, or reliability, following these steps ensures your system runs safely and efficiently.
At HighOutputAlternator.com, we provide plug-and-play alternators, wiring kits, and expert support to make the upgrade smooth—no guesswork needed.
📞 Need Help?
Contact our team for custom installation advice, vehicle-specific instructions, or Big 3 wiring support. We’re here to help you get powered up.